Glass and liquid texturing

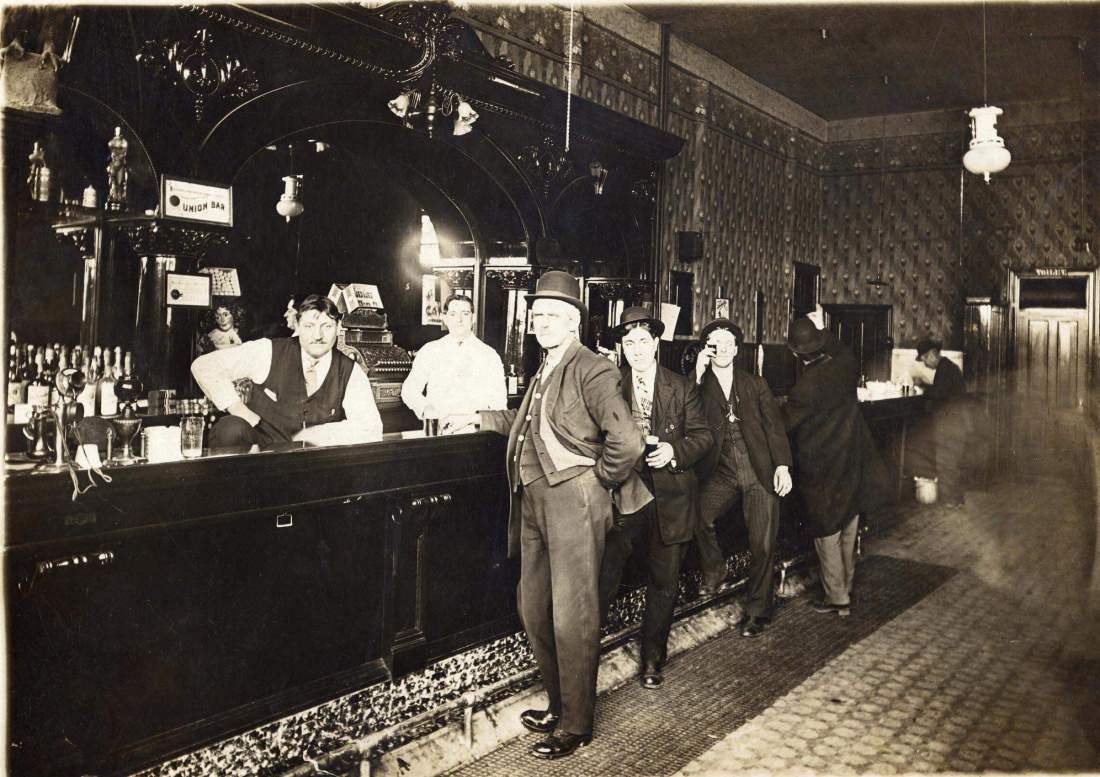
One of the materials that will be used in my speakeasy is glass. Glass is integral to creating the various bottles and glasses in the speakeasy, so the knowledge of how to create and implement glass will be crucial when making the speakeasy. To learn how to create glass, I watched a tutorial.
The process is quite simple; it involves creating a new material and changing its properties. These properties are specular hardness, raytrace type transparency, alpha, Fresnel, IOR and depth. By changing these properties, I created a glass material.
This tutorial was quick and easy, and I had no trouble creating glass in Blender.


Another important part of the speakeasy is the alcohol, or in this case, a liquid texture. Without liquid to fill the bottles and glasses, the speakeasy would be completely barren. To learn how to create liquid, I watched a tutorial.

The process of creating a liquid is simple. I just had to copy the shape of the interior of the glass, which in this case, was a hollow version of the cube I made in the previous tutorial. I filled this shape and created a meniscus (the slightly raised edge of the liquid, which sticks to the glass because of surface tension). I then created a glass BSDF material for the liquid, and edited the IOR and colour, to make it look like beer. I also added a volume absorption node, so that the light is absorbed by the liquid in a realistic way.

Overall, both tutorials were easier than I expected, but they delivered excellent results that I did not expect at the beginning.


Creating detailed textures in Blender

To create my speakeasy, I would need to start from the ground up- or in this case, the floor. To do this, I will need a realistic floor texture, which can react to light in full detail. I followed a tutorial on how to edit a texture to create bump, reflection and displacement maps, and how to implement these in Blender.
The tutorial showed me how to create the aforementioned texture maps, and how to configure nodes to display them correctly. Unlike the bump and reflection maps, the displacement map is implemented with a modifier instead of nodes. This is done by subdividing the surface 100 times and adding a displace modifier.

During the tutorial, I made a few simple mistakes that hindered my progress. My first mistake is that I couldn’t see the nodes. To troubleshoot this, I changed to cycles render, UV unwrapped the texture, added a new material in node view and toggled the use nodes option. My second mistake is that I couldn’t see the texture. I initially thought the material wasn’t on the plane, but it turns out that I was in solid view instead of material view. It was a simple mistake that I overlooked because I was following the tutorial, which was very fast paced.
I found this tutorial effective, because it taught me how to create detailed textures in Blender instead of just Unreal, which will be useful when creating individual items and scenes outside of a game engine.


A fresh start

In order to create a reworked version of my project, I would need to completely refresh my knowledge of 3D modelling, texturing and rendering. To do this, I watched a series of tutorials.

I started by installing the latest version of Blender on my personal laptop. This was quick and easy to do. The advantage of using Blender is that it’s completely free to use and is installed on the college computers, which allows me to use it at home and at college. The first tutorial showed me how to navigate the user interface (UI) and use shortcuts, which I was already familiar with.

The second tutorial showed me how to create models in Blender. This was the barrel tutorial I completed last year, but re-watching it allowed me to refresh my knowledge of the UI and techniques used for modelling. The technique used to create the barrel involves adding shapes, using edit mode tools such as extrude and subdivide to edit the geometry of a shape, using wireframe for editing shapes, using the mirror modifier to make a shape symmetrical, merging shapes together using the join function, and creating a basic material using flat colours. Because I already knew how to use these functions, I could create the barrel quickly, but the tutorial helped me to remember some shortcuts I forgot about. The following screenshots are of the barrel I made.

The third tutorial showed me how to texture an object in Blender. Despite having done this before, I still have some trouble with remembering the process, so the tutorial helped me to relearn texturing at my own pace. This tutorial taught me how to mark seams, UV unwrap, create a colour map and generate an ambient occlusion texture. I completely forgot this process after the first time I learned it, because at the time, I had only just learned how to create 3D models, and I was taking in too much information to remember it all.

The fourth tutorial showed me how to render and export in Blender. This involves using nodes in cycles render to edit the material, create light emitting materials, and using the render function to create a fully rendered image in Blender.

Barrel 6

Overall, these tutorials were very effective, because I’m a visual learner and prefer video tutorials. They reinforced my existing knowledge of Blender and helped me relearn texturing, which I didn’t fully understand upon learning for the first time. This has also given me a chance to reconsider my approach to the project, and I will now use video tutorials to learn how to create everything I need for my speakeasy.

Redesigning the project

Initially, I had planned to create a full 3D speakeasy environment. However, this didn’t go to plan, and I quickly became overwhelmed by the workload and lack of direction. I have decided to scrap my original concepts, in favour of a smaller, more manageable project. The new project will focus on a corner of the speakeasy, that focuses on the bar and the props found there. A small scale project like this will allow me to focus my efforts and create a highly detailed section of the speakeasy. The following is a revised list of assets I will need to create:

  • Bar
  • Shelves
  • Walls (wallpaper/brickwork)
  • Floor
  • Ceiling
  • Beer bottles
  • Glasses
  • Ashtray
  • Cigar
  • Stools
  • Lighting
  • Kitchen door
  • Cash register

The goal of this project is to create an atmosphere. To replicate the atmosphere of a speakeasy, elements such as the the lighting, materials and props must be perfect. For example, the decision to include a door to the kitchen at the bar, was motivated by the lack of modern bar features such as a sink. I tried to research how a sink would look in a 1920s speakeasy bar, only to find that speakeasies didn’t have sinks at the bar, because they would be found in the kitchen.

dot-dot-dot-speakeasy-park-road-shopping-centerSPEAKEASIES

Likewise, the decision to put the alcohol shelves and cabinets front and centre, was based on reference images where this design feature is also prominent. I will also include props such as glasses and an ashtray at the bar, to make the bar feel alive.

Owl Bar-11

One bar prop I have forgotten to include is a cash register. This is an oversight I have made because I focused on other props. Upon closer inspection of some of my reference images, I realised my mistake, and have decided to change my design to include this.

EP-140829101

I have also redesigned the floorplan, drawn a front view of the shelves and cabinets at the bar, and created a perspective drawing of the bar.


First attempts at 3D modelling

I have decided to begin my project by 3D modelling some items that would be found in a speakeasy. Since I’m not very experienced with 3D modelling in Blender, I started by making some simple models. I have made a stool, two tables, a whiskey glass, a champagne glass and a decanter. These were mainly made using shape editing tools such as extrude and subdivide. I’m especially proud of the champagne glass and the decanter. However, some shapes are complex and I don’t know how to replicate them effectively using the tools available.


List of references

References required:

  • Street view of surrounding buildings
  • Materials for buildings and props
  • Secret entrances
  • Interior architecture
  • Furniture
  • Props
  • Types of alcohol
  • Fonts and colour schemes for signs
  • Lighting

Props:

  • Alcohol bottles, mugs, flasks and glasses
  • Barrels
  • Tables, chairs and stools
  • Signs
  • Cigars, cigarettes and ashtrays
  • Lamps and candles
  • Playing cards

Architecture:

  • Shopfront
  • Walls and brickwork
  • Windows
  • Doors and secret entrance
  • Flooring and woodwork
  • The bar
  • Stairs
  • Fireplace
  • Ceiling lights and fans

Extras:

  • Car

Initial research and design decisions

Facts

  • “Speakeasies” got their nickname because they required a password which must be spoken quietly.
  • They were also known as “gin joints” and “blind pigs”.
  • Cocktails were invented to enhance the taste of poorly distilled alcohol.
  • Prohibition caused organised crime to skyrocket.

When designing a speakeasy setting, many factors must be taken into account. There are multiple types of speakeasies, from fancy ballrooms, restaurants and nightclubs, to basements and apartment rooms. Pretty much anywhere that served alcohol during prohibition was considered a speakeasy. For my speakeasy, I have decided to design a cozy, underground bar. I want to create something with a warm atmosphere, which still conveys a sense of secrecy. Likewise, there are many different types of alcohol to choose from, such as wine, whiskey and homemade moonshine. Some speakeasies even served chemicals such as carbolic acid to unsuspecting patrons. Because I plan to design a respectable establishment, only high quality alcohol will be on offer. I will design unique cocktail glasses, bottles and flasks for each drink.

For the speakeasy location, I’m considering New York City. There are plenty of real life speakeasies to be found in NYC, such as The Cotton Club and Chumley’s. This depends on the amount of information available. A real speakeasy would need to be accurate and would require plenty of references for the interior and exterior. I also have the option to design a fictional speakeasy. A fictional speakeasy would allow for more creative freedom and would lack the aforementioned restrictions, allowing me to focus on the finer details.

Along with the interior of the speakeasy, I must also design an exterior. This would consist of the neighbouring buildings on the street, and props such as cars, outdoor restaurant furniture, and shop fronts. This depends on the placement of the speakeasy itself. It could be on the high street, or tucked away in an alley. Architecture must be taken into account. This includes brickwork, windows, signs and doors. Authentic materials must be used. For signs, posters and graphic design, authentic fonts, colour schemes and art styles must be used.